how to draw a jet step by step.
In this drawing lesson, you will learn How to draw a jet step by step.
This simple instruction will consist of six steps.
For more drawing videos, you can visit my youtube channel: Easy Drawings.
In today’s lesson, we will talk about how to draw a jet step by step.
Drawing a jet may seem like a daunting task at first, but with a little patience and practice, anyone can learn to create a realistic-looking aircraft. In this article, we’ll take you through the steps to draw a jet.
Materials
- Pencil
- Paper
- Eraser
- Coloring supplies
Time needed: 30 minutes.
How to draw a jet step by step for beginners.
- Step 1

Draw the front body of the jet.
To draw this step, depict the figure using two curved lines.
- Step 2
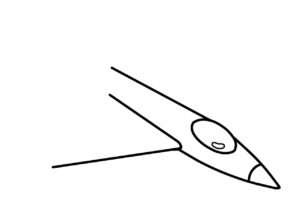
Add the first wing on the left of the jet.
Depict the first wing of the aircraft using straight lines of different lengths.
- Step 3
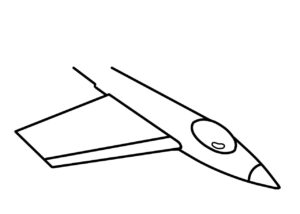
Once you have the basic shape of the jet drawn, it is time to add the details. Use your pencil to lightly sketch in the details of the jet, such as the lines and contours of the wings and the body. Pay attention to the curves and angles to make the jet look more realistic. Use the ruler to create straight lines for wings like a picture .
- Step 4
Add the second Wing
draw the second wing, like a first wing
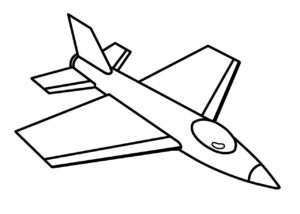
- Step 5

Draw two diagonal lines from the ends of the horizontal line, angling downwards to create a triangle shape.
Remember to use light pencil strokes at first, and then darken the lines as you add details.
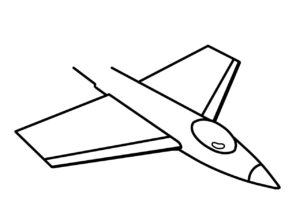
- Step 6
Draw a horizontal line connecting the two stabilizers to complete the tail of the jet.
Painting a jet may be a rewarding and enjoyable activity. While following the procedures and practice will help you design a realistic-looking airplane, it may appear frightening at first. Remember to start with light pencil strokes and progressively deepen the lines as you add details. To make the jet appear more realistic, pay attention to the curves and angles, and don’t be afraid to make mistakes. You may make your drawing more three-dimensional and lifelike by adding shadows and texture. You can make a detailed and beautiful jet drawing with practice and perseverance.
How to teach your child to draw
For youngsters, drawing is a fun and fulfilling hobby that allows them to express their creativity and imagination.
There are a few suggestions and tactics you can use to make the process smoother and more fun for your child if you want to assist them develop their sketching abilities.
Here are some ideas for teaching your youngster to draw.
Begin with Basic Shapes.
When your youngster is first learning to draw, it might be beneficial to start with simple shapes such as circles, squares, and triangles.
These shapes may be joined to make more complicated drawings, and they are an excellent starting point for learning how to draw more detailed objects and settings.
Use Simple Tools
Young children don’t need fancy art supplies to get started with drawing. A few simple tools like crayons, colored pencils, and paper are all they need to begin practicing their skills. As they get more advanced, you can introduce more advanced tools like paint, markers, and charcoal.
Encourage Experimentation
One of the most enjoyable aspects of drawing is that there are no restrictions.
Encourage your child to try new colors, shapes, and approaches to see what they can come up with.
Let them to make errors and remind them that they can always start over if they don’t like how something comes out.
Give Motivation
Youngsters may require a little motivation to begin painting.
Give them with images, books, and other materials that demonstrate various styles and methods.
You may also take children to museums or art galleries to experience different sorts of art firsthand.
Exercise, Exercise, Exercise
Drawing, like any other skill, takes practice to master.
Encourage your child to draw on a regular basis and to save his or her pictures in a sketchbook or folder.
This will allow them to observe how their abilities improve over time and will provide them with a sense of success.
Offer Feedback
When your child shows you their drawings, offer constructive feedback that is both encouraging and helpful. Point out what they did well and offer suggestions for how they can improve. Make sure to always praise their effort and creativity.
Make it Fun
Your youngster should find drawing to be a pleasurable and entertaining hobby.
Provide a friendly and encouraging environment where kids can express themselves and try new things.
Drawing may also be made into a social pastime by inviting friends over for a drawing party or drawing as a family.
Finally, teaching your child to draw may be a wonderful experience for both of you.
You may assist your child improve their sketching abilities and creativity by starting with basic shapes, using simple tools, encouraging experimentation, providing inspiration, practicing often, providing feedback, and making it entertaining. Your youngster may even become an accomplished artist with time and effort.
How to draw a jet step by step for beginners.
More videos:
Keywords:
how to draw, drawing, easy drawing, learn to draw, simple drawing ideas, simple drawing, drawing ideas,
things to draw, jet to draw, how to draw jet, Earth drawing,how to draw military aircraft, how to draw a F-16 Fighting Falcon, how to draw fighter planes, how to draw fighter aircraft, how to draw a simple fighter plane, how to draw a fighter plane, how to draw a realistic fighter jet,
easy a jet drawing, how to draw a jet step by step.How to draw a jet step by step for beginners.