How to Draw a Rose
Drawing a rose is a popular subject for artists of all skill levels. With its delicate petals and intricate structure, the rose can be a challenging yet rewarding subject to draw. Here are lesson and steps to help you create a beautiful rose drawing.
Materials
Pencil
Paper
Eraser
Coloring supplies
Time needed: 30 minutes.
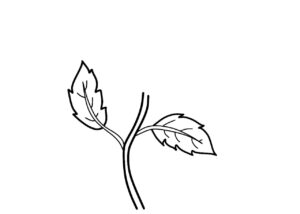
- Step 1

Add the stem first.
Use two vertical, parallel lines. Sketch the stem’s lower portion.
When sketching the shape of a stem, start with its lower portion. Sketch lines that are parallel and vertical to one another so that you can tell easily when it’s complete.
- Step 2

Sketch out the leaf on one side.
On the left, depict the small oval-shaped leaf.
- Step 3
again Sketch out the leaf on one side.
On the side, depict the small oval-shaped leaf.
- Step 4
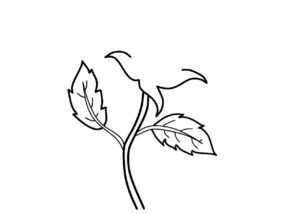
On the left, draw another pointed leaf on the right side of the petals.
Draw the elements of the petals. Depict the protruding parts of the petals on the sides of the rosebud, like you did with your leaves. On the left side, draw one pointed leaf.
- Step 5
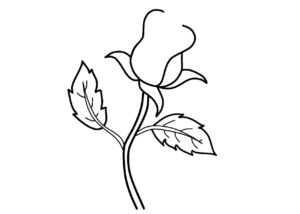
Draw the line in a spiral of the petals.
- Step 6
Add some smooth, curved lines to the swatch.
Add a couple of curves to the outer petals and then dimension up a little bit in the middle to save space.
It is more difficult to depict the petals, since they are curved and harsh lines would be too smooth.
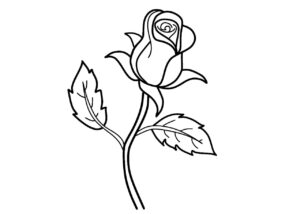
How do you make the rose appear more realistic in your drawing?
You can make the rose appear more realistic in your drawing by keeping the lines very thin and light, with little detail. You can also try to outline the shape of the petals and add a few highlights to make it look nice.
You can draw the rose using many different colors and shades. You can also add shading with your pencils to make it look more realistic. You can also pick up a few drops of watercolor and add some color to your rose without blending in completely.
The drawing of a rose is an art. It requires imagination and creativity to make the drawing look good. The first step is to draw the outline of the petals and determine how big each petal will be in proportion to each other (for example, a long-stemmed rose with short petals). Then take some time to study how petals are constructed and eventually you will understand how to draw them.
For example, a realistic rose is not just any ordinary flower. The petals are bent in a specific way to make each one appear as if it were real.
What is the best way to practice drawing roses?
Drawing roses requires a lot of practice. It’s challenging to draw roses that look real, so I suggest practicing drawing them with the help of a rose in a book or magazine. You can also do some research to see what ones look like, or mess around with colors and patterns until you get the image you think is perfect.
Rose drawings are a great way to try out your new skills. Here are some tips on how to draw roses in practice mode: 1) Choose a medium – drawing paper or card is ideal. 2) Draw with the pen in one hand and stencil brush with the other hand. 3) Start with a simple shape and then add details. 4) Practice small details first, like adding bubbles or underlayers before moving on to larger strokes.
Roses can be drawn on paper or with pencils and charcoal. For practice, draw a variety of roses and compare their characteristics. Practicing at different times of the day will allow you to see the difference between morning light and evening light.
No matter how well you draw roses, there will always be times when you fall short. But with practice, any artist can improve their skills. Over time, you’ll find yourself getting closer to that perfect rendition of your favorite flower.
What are some common mistakes that beginner drawers make, and how can they be avoided?
There are many mistakes that beginners make, some of the most common ones include not practicing their new techniques, or learning how to draw in a way that is too different from what they have been doing in the past. Using incorrect tools can also cause these problems so make sure you are using proper materials and learning new techniques from a reliable source.
Mistakes that beginners often make are stepping out too far from the reference, rush to finish a drawing and not taking enough time to develop the skills needed to produce amazing work
One of the biggest mistakes that beginner drawers make is not knowing what they are doing. These beginners will start with a strategy but before long, they might change the plans, modify the strategies and so on. If one thinks before engaging in a new activity, then he or she can avoid these mistakes by doing lots of research.
First, beginners can make the mistake of drawing too much detail in small parts. It’s a good idea to draw large shapes first and then add finer details later. Another common mistake is forgetting that lines should be thicker in some places than others, which will cause shading issues if not corrected. The second biggest mistake for beginners is drawing for scale, which will invariably result in poor proportions.
What impact does the type of paper you use have on your drawing?
Your drawings’ appearance is greatly influenced by the type of paper you use. Paper is available in a range of weights to suit the needs of artists of all skill and experience levels, from medium-weight drawing paper to card stock!
The type of paper you use, from the fine line ink in a sketchpad to heavier-duty paper for larger drawings, can affect the tone of your drawing. Your drawing will be interpreted differently by others depending on the thickness of your pencil or pen lines and the pressure you apply.
In two different ways, the type of paper you use will impact your drawing. Your technique is impacted by how it is set up and feels in your hands. No graphite is required; instead, you must use glossy, non-crease paper. If you’re drawing on bristol board, a smooth surface will make it simpler to make precise marks.