How to draw a motorcycle
In this drawing lesson, you will learn How to draw a motorcycle step by step.
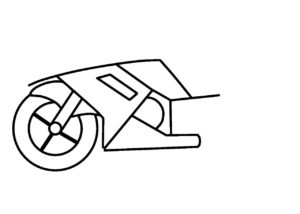
This simple instruction will consist of six steps.
For more drawing videos, you can visit my youtube channel: Easy Drawings.
Teaching drawing to beginners is one of the most beautiful ways that help them express themselves and their hobby,
Drawing a motorcycle can seem like a challenging task, but with the right approach, it can be easy and fun. Here’s a step-by-step guide to help you draw a simple motorcycle:
How to draw a motorcycle step by step.
- Step 1
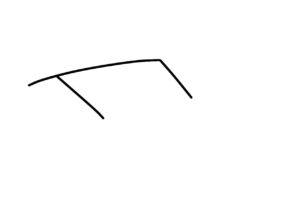
Draw the top of the motorcycle.
Use smooth curved lines to draw the top as shown in the example.
- Step 2
Draw a motorcycle exhaust pipe.
Draw the detail at the bottom of the motorcycle using a curving line.
- Step 3
Draw the motorcycle first wheel.
Depict one circle at the front and back of the motorcycle and add circles inside them.
- Step 4

Install a front shock absorber.
Draw some curved lines and an arc at the front of the motorcycle.
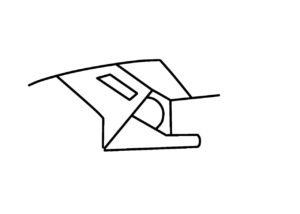
- Step 5

add engine components.
Draw two circles and one curved line in the middle of the motorbike.
Draw the motorcycle second wheel.
add second circle at the back of the motorcycle and add circles inside them.
- Step 6

Draw the motorcycle’s top.
Draw the top with smooth curving lines.
Detail the steering mechanism.
Include little curling parts.
In conclusion, drawing a motorcycle can be enjoyable and satisfying. A basic motorcycle illustration can be made by following a straightforward step-by-step tutorial; from there, you can add to and improve it as you gain experience. Never be hesitant to try new things or to give the design your own special touches. You can draw a beautiful motorcycle that you can be proud of if you have patience and perseverance.
How to start Drawing?
There are a few things you should bear in mind if you wish to start painting frequently. Determine your motivation for drawing first. What inspired you to start drawing? What benefits do you anticipate from this activity? Once you are aware of why you are drawing, you might select a topic that has some personal significance for you. For instance, you could decide to sketch dogs since you have one or the sun because you have knowledge of it. The second crucial point to remember is that sketching is something you do to create, not to get a result.
When is the right time to start drawing?
There is no “correct” moment to begin sketching. It is a personal decision that can begin at any age or stage of life. Some people begin sketching as youngsters and continue to improve their talents throughout their careers, whilst others begin later in life as a pastime or a method of self-expression. The most essential thing is to want to learn and have the patience to practice and improve your abilities. Remember that learning to draw is a journey rather than a goal, and the more you practice, the better you will become.
Why you should keep drawing?
Every day drawing is one of the leading things you’ll do for your mental wellbeing. It can assist you calm push, construct self-esteem, and center on one thing at a time. It can moreover assist you create your inventiveness and creative ability. As you keep drawing, you may take note that your skills are moving forward and your drawings will begin looking better and way better. Day by day drawing is additionally a awesome way to keep your intellect dynamic because it requires you to think diverse considerations than what you’re utilized to.
What are some common mistakes to avoid when drawing a motorcycle, and how can you fix them?
Ignoring perspective: Another mistake is not considering perspective while drawing. A motorcycle should look three-dimensional, with the wheels and other parts appearing to recede into the distance. To fix this, you can study the rules of perspective and apply them to your drawing.
Not paying attention to details: Overlooking small details can take away from the realism of the motorcycle. Make sure to add the necessary bolts, seams, and other details to make the motorcycle look more lifelike.
Improper shading: Improper shading can make a motorcycle look flat and unrealistic. Pay attention to the way light falls on the different parts of the motorcycle, and shade accordingly to create depth and texture.
Ignoring the environment: The environment in which the motorcycle is drawn can greatly affect the overall look of the drawing. Adding elements such as the road, trees, and buildings can give the motorcycle a sense of place and add to the overall composition.
Keep in mind that drawing is a process, and that process usually includes mistakes.
The secret is to persevere, be patient, and learn from your mistakes.
There are a few materials that can be utilized for drawing motorcycles, like pencils, charcoal, pastels, write and ink, and colored pencils. Each fabric has its possess interesting properties and points of interest that can be valuable for diverse viewpoints of drawing.
Pencils:
Pros: They are readily available, versatile, and easily erasable, making them a popular choice for preliminary sketches and underdrawings. The range of hardness from soft to hard also allows for varying degrees of shading.
Cons: Pencil drawings can smudge easily and the marks can be difficult to erase completely, especially on certain surfaces.
Charcoal:
Pros: Charcoal can produce deep, rich blacks and velvety grays, and the medium can be blended easily for smooth transitions of tone.
Cons: Charcoal is messy and can smudge easily, so it’s not ideal for finished pieces or works that need to be protected.
Pastels:
Pros: Pastels are excellent for creating rich, vibrant color and can be blended to create soft, subtle transitions of hue.
Cons: They can be messy and can be difficult to control, especially for fine details. Pastel drawings also need to be sprayed with a fixative to prevent smudging.
Pen and Ink:
Pros: Pen and ink drawings are precise and clean, making them well-suited for technical illustrations. They are also well-suited for works that will be reproduced, as the lines will not blur or smudge.
Cons: They can be difficult to erase and mistakes can be difficult to correct. They are also not ideal for shading or creating soft, subtle tonal transitions.
Colored pencils:
Pros: Colored pencils are versatile and come in a wide range of colors, making them ideal for adding color to a drawing. They are also easily erasable, making them a good option for underdrawings or preliminary sketches.
Cons: The color can be difficult to blend, making it challenging to create smooth transitions of hue. Colored pencils can moreover be time-consuming to utilize and the marks can be troublesome to delete completely. Ultimately, the choice of fabric will depend on the individual’s individual inclinations, the required last result, and the extend prerequisites.